What do you think, is 15 months long enough to go without an update? Yeah, I think so too.
Let's get right into the meat of it then. Now where did I leave off... -Rummages through old posts. Sounds of scrap tubing bouncing off the floor accompany muffled curses-
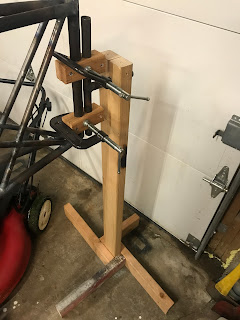
AHA! Found it. We were waiting to finish weld the fuselage. I had a good review from my Tech councilor in April of 2021 and started in on finish-welding the fuselage. I started at the tailpost and worked forward, spiraling around the fuselage as I welded each tubing cluster. I made up a rotisserie of sorts to allow me to turn the fuselage for better access to all sides of each weld.
The rotisserie consisted of two 2x4 stands with a hole drilled in an
end. This hole accepted a piece of tubing on which the fuselage could
rotate. This is probably one of those "a picture is worth 1000 words"
deals, so here ya go. The front pivot is just some gas pipe bolted to a plywood plate. The
plywood is held on the fuselage with plumbers strap and screws.
 |
| One of the worst clusters: 6 tubes. |
But wait, there's more! Since I had the control stick welded up, I figured it best to make progress on the rest of the control stick assembly. I re-re-re welded the bushing onto the control stick
torque tube and finally got it right this time. All that welding in one place put a bit of a bend into the torque tube, so I had to spend some time with the torch heating and bending to get the bow out. The aft end of the torque tube slips into a tube welded onto the front of the seat. That went in next. This caused the front of the seat to warp, just like the torque tube had, so a little time with the torch was necessary to relax it back out and get everything in line again. With all of this done the torque tube received a pair of stop-rings to capture the rear pivot. The forward stop-ring is welded on and the rear one is held with a bolt so the torque tube can be removed if necessary. This bolt doubles as a stop so you can't push the stick too far left and right. A little C-shaped bracket will eventually be welded to the seat frame to capture this bolt.
While I was working on the front of the seat, I decided to weld up the rest of the seat-base. This consisted of two little "L"s of tubing mitred together. Quick and easy.
A couple other little things got done like making the engine-mount bushings for the firewall and welding caps on the forward ends of the longerons.
That catches us up to the beginning of 2022. That's all the pictures I took, so the next post will catch up to current progress. Gotta go snap some photos!
Total time: 613.55hr


Comments
Post a Comment